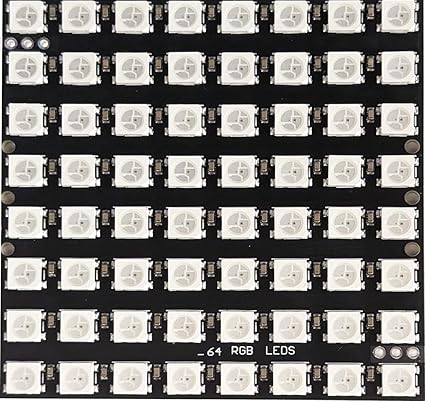
8×8のフルカラーLED(マイコン内蔵RGBLED 8mm PL9823-F8)でmikasafont(アルファベット大文字小文字と数字)を表示やスクロールさせます。
misakifont
8×8のLEDにmisakifontを読み込んで文字を表示やスクロールさせます。
フルカラーLED(マイコン内蔵RGBLED 8mm PL9823-F8)マトリックスモジュール
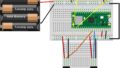
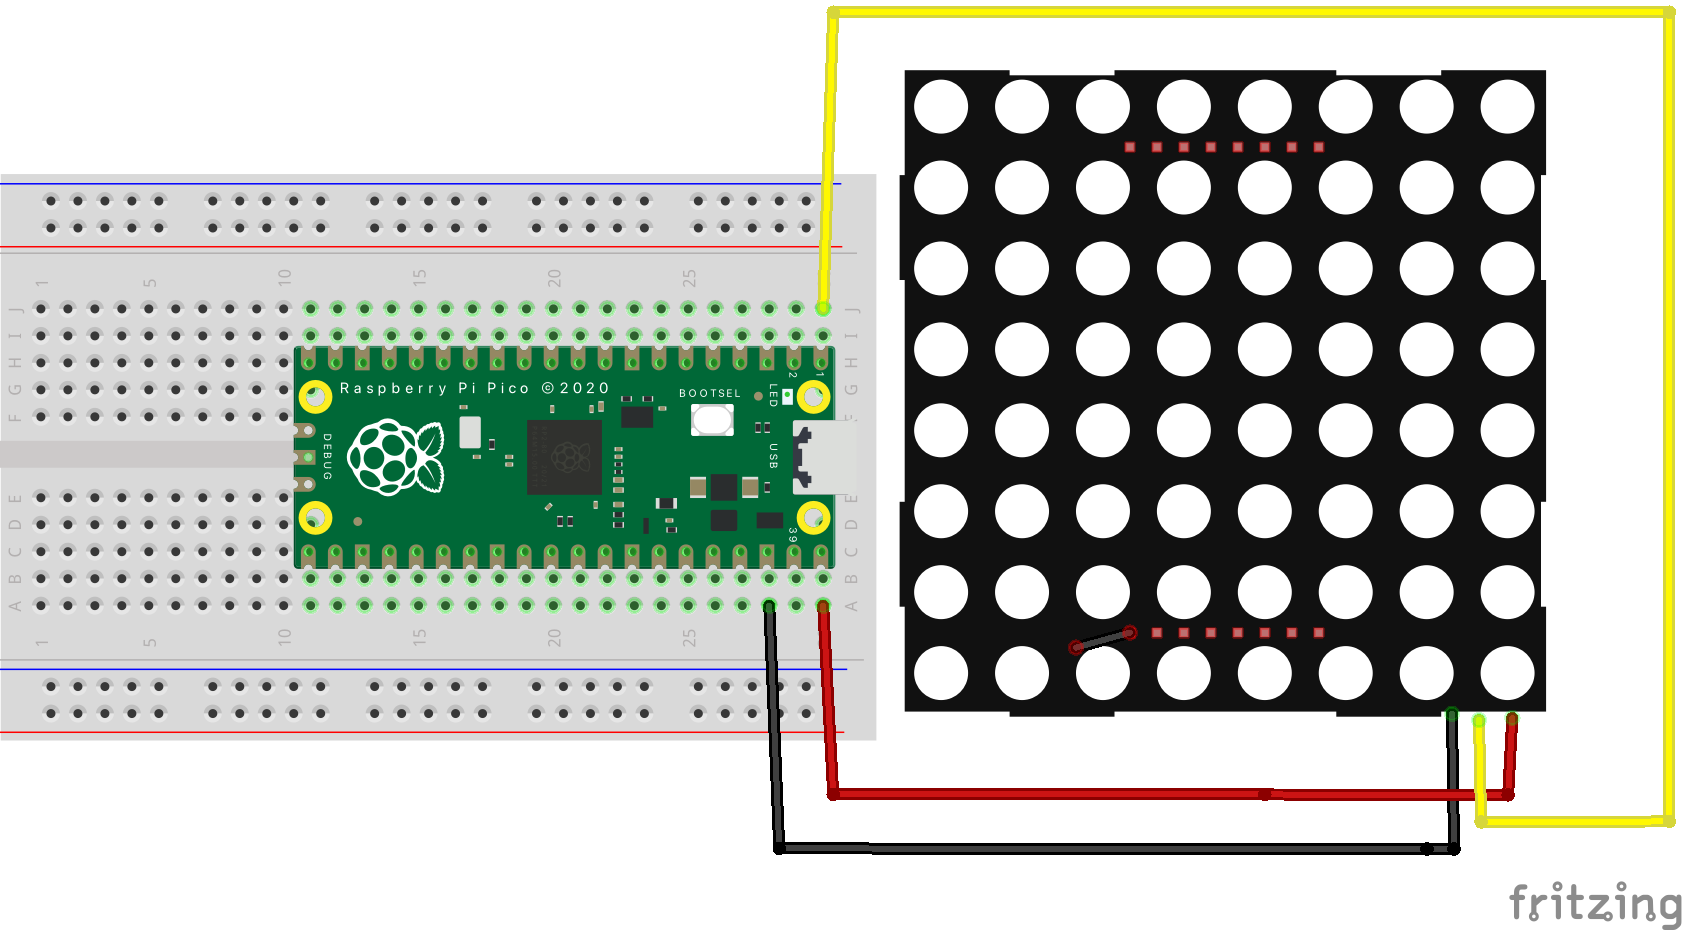
配線図
Vー 38:GND
IN 1:GPIO 0
V+ 40:VBUS
LEDによって配置が変わるので信号線(黄色)と電源を間違えないように。
MicroPythonプログラム
事前準備
misakifont(フォルダー)をgithubからダウンロードしPICOに保存します。
開いたサイトの右上(緑色の)CODEアイコンをクリックしてZIPファイルをダウンロードできます。
開いたサイトの右上(緑色の)CODEアイコンをクリックしてZIPファイルをダウンロードできます。

neomatrix.pyを作成してPICOに保存します。
# NeoPixel ドットマトリックス表示ドライバ
from machine import Pin
from neopixel import NeoPixel
import time

class NeoMatrix:

    # コンストラクタ
    def __init__(self, pin, w=8, h=8):
        self.width = w
        self.height = h
        self.pin = Pin(pin, Pin.OUT)
        self.np  = NeoPixel(self.pin, self.width*self.height)

    # ドットマトリックス 指定座標ピクセル番号変換

    def XYtoNo(self, x, y):
        # 反転を一切行わず、単純にx, yの座標をそのままピクセル番号に変換
        return self.width * y + x


    # 表示更新
    def update(self):
        self.np.write()

    # 表示クリア
    def cls(self,flgUpdate=False):
        self.np.fill((0,0,0))
        if flgUpdate:
            self.np.write()

    # 点の描画
    def pixcel(self,x,y,color,flgUpdate=False):
        self.np[self.XYtoNo(x,y)] = color
        if flgUpdate:
            self.np.write()

     # 全領域塗りつぶし
    def fill(self,color,flgUpdate=False):
        self.np.fill(color)
        if flgUpdate:
            self.np.write()

    # 単色8x8ビットマップの配置
#     def putBitmap(self, bmp, fg, bg, flgUpdate=False):
#         for y in range(0,self.height-1):
#             for x in range(0,self.width-1):
#                 self.np[XYtoNo(x,y)] = fg if (0x80>>x) & bmp[y] else bg
#         if flgUpdate:
#             self.np.write()
    # 単色8x8ビットマップの配置
    def putBitmap(self, bmp, fg, bg, flgUpdate=False):
        for y in range(self.height):  # 高さ分ループ
            for x in range(self.width):  # 幅分ループ
            # bmp[y] がビットマップのy行目を表す (1行のビット列)
            # もしビットがセットされていれば前景色、セットされていなければ背景色を設定
                color = fg if (bmp[y] & (0x80 >> x)) else bg
                self.np[self.XYtoNo(x, y)] = color
        if flgUpdate:
            self.np.write()


    # ドットマトリックス 左スクロール
    def scroll(self, flgUpdate=False):
        for y in range(self.height):
            for x in range(1,self.width):
                self.np[self.XYtoNo(x-1,y)] = self.np[self.XYtoNo(x,y)]
            self.np[self.XYtoNo(self.width-1,y)]  = [0,0,0]
        if flgUpdate:
            self.np.write()

    # 1文字左スクロール挿入
    def scrollIn(self, fnt, color, tm, ypos=0, fw=8, fh=8):
        for i in range(0,fw):
            self.scroll()
            for j in range(0,fh): # フォントパターン1列分のセット
                self.np[self.XYtoNo(self.width-1,j+ypos)] = color if fnt[j] & (0x80 >> i) else (0, 0, 0)
            self.np.write()
            time.sleep_ms(tm)

    # 直線を引く
    def drawline(self, x0, y0, x1, y1, color, flg=True):
        dx=abs(x1-x0)
        dy=abs(y1-y0)
        sx=(0 < (x1-x0)) - ((x1-x0) < 0)
        sy=(0 < (y1-y0)) - ((y1-y0) < 0)
        err=dx-dy
        if (x0!=x1) or (y0!=y1):
            self.np[self.XYtoNo(x1,y1)] = color

        while True:
            self.np[self.XYtoNo(x0,y0)] = color
            e2=2*err
            if e2 > -dy:
                err-=dy
                x0+=sx

            if e2 <  dx:
                err+=dx
                y0+=sy
            if not ((x0!=x1) or (y0!=y1)):
                break
        if flg:
            self.np.write()

    # 直線、ボックス、塗りつぶしボックスの描画
    def line(self, x1, y1, x2, y2, color, mode=0, flg=True):
        if mode == 0:
            # 直線
            self.drawline(x1,y1,x2,y2,color,False)

        elif mode == 1:
            # 矩形
            self.drawline(x1,y1,x2,y1,color,False)
            self.drawline(x1,y1,x1,y2,color,False)
            self.drawline(x1,y2,x2,y2,color,False)
            self.drawline(x2,y2,x2,y1,color,False)
        else:
            # 矩形塗りつぶし
            w = abs(x1-x2)
            h = abs(y1-y2)
            x=x2 if x1>=x2 else x1
            y=y2 if y1>=y2 else y1
            for i in range(0,h+1):
                self.drawline(x,y+i,x+w,y+i,color,False)
        if flg:
            self.np.write()
一文字ずつ表示するプログラム
from time import sleep_ms
from misakifont import MisakiFont
from neomatrix import NeoMatrix

pin = 0                # NeoPixelマトリックスのピン設定
maxBright = 15          # 最大輝度

str = "今日は"          # 表示する文字列
np = NeoMatrix(pin)     # NeoMatrixのインスタンス作成
mf = MisakiFont()       # MisakiFontのインスタンス作成
np.cls()                # 画面を初期化

while True:
    for c in str:
        # 文字のビットマップを取得 (Trueのままで表示)
        d = mf.font(ord(c), False)

        # 文字のビットマップデータをNeoMatrixで表示
        # fgは文字色、bgは背景色(黒)
        fg = (25, 25, 25)  # fg = 白色に設定
        bg = (0, 0, 0)     # bg = 黒色

        # ビットマップデータを表示
        np.putBitmap(d, fg, bg, True)

        # 1秒間表示
        sleep_ms(1000)

        # 画面をクリア
        np.cls(True)
スクロール表示するプログラム
"""
Neopixel 8x8ドットマトリックス 美咲フォント表示デモ

"""
from time import sleep_ms
from random import randint
from misakifont import MisakiFont
from neomatrix import NeoMatrix

pin = 0
maxBright = 15

str="今日は"
np = NeoMatrix(pin)
mf = MisakiFont()
np.cls()

while True:
    #矩形の表示
    for i in range(5):
        color = [randint(0, maxBright) for n in range(3)]
        for j in range(0, 4):
            np.cls(False)
            np.line(j, j, 7-j, 7-j, color, 1)
            sleep_ms(150)

    #文字のスクロール表示
    for c in str:
        d = mf.font(ord(c),False)
        color = [randint(0, maxBright) for n in range(3)]
        np.scrollIn(d, color,100, fw = 8 if mf.isZenkaku(ord(c)) else 4)
    sleep_ms(1000)
    np.cls()
使い方
自由研究
テンテン
センサーと組み合わせて文字が表示できますね。